


Equipment Maintenance & Care
Maintenance machinery timely will be helpful to the stability of machinery, avoid potential problem, auxiliary equipment refer to supplier requirements
Attention:
This characteris under normal environment situation.
Please short maintenance if the using condition is b a d .
Please maintenance machinery according machinery real situation.
Maintenance should be done by professional or trained person, familiar with china-beverage manul, equipped with relevant safety device.
Abide by machinery safety requirements when maintenance machinery.
Ensure all electrical parts dry, no acid or alkaline contact.
Maintenance usually goes with lubrication work.
please check after every maintenance:
All parts connect right and tight.
All adjustment finished.
All irrelevant parts are clean out of machinery, such as changed parts, mop, tool etc.
Clean machinery.
More information please ask china-beverage technician .
1. Equipment Lubrication
General rules for lubrication
Please check the quality of grease in the reducer during primary 2 months. If the grease has quality problem, please find out the reason and change the grease.
The grease indicated in the table should be standard grease in certain working environment and period.
If the environment is special, please consult china-beverage’s technician.
Period in the table means
1 week-150 working hours
1 month=500 working hours
3 months=1500 working hours
1 year=5000 working hours
3 years=15000 working hours
Wipe dirty things before greasing, wipe any excess grease off
Do not mix two different grease together unless get the permission from china-beverage’s
1.1 Heater Lubrication Points
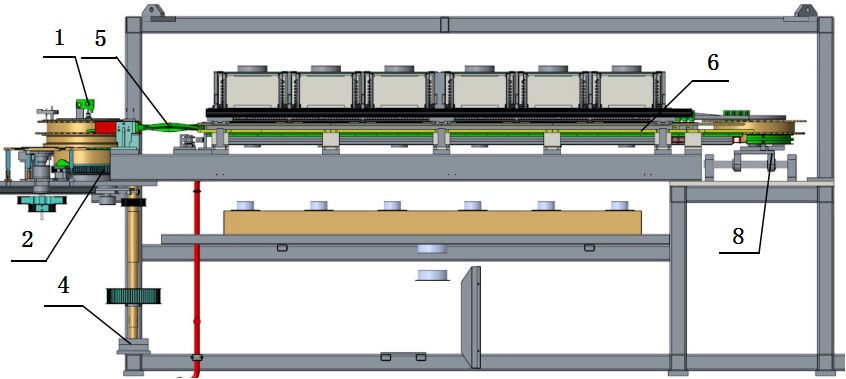
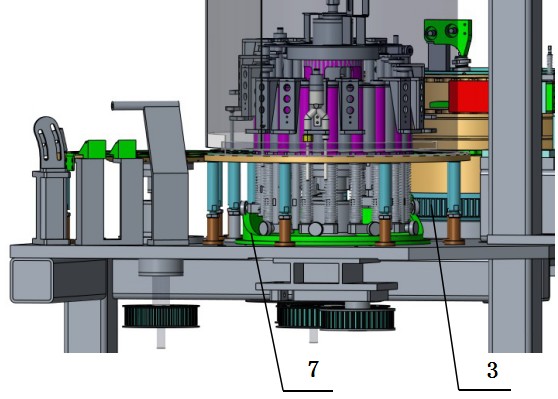
| No | Lubrication Position | Greasing way | Oil type | Lubrication period |
|---|---|---|---|---|
| 1 | Top guide rail in the oven | single-point lubricator | Mobil EP2 | replace the lubricator every 6 months |
| 2 | Rotary supporting roller way for the oven | oil gun, manual adding oil | Mobil EP2 | 160 adding oil every 160 hours |
| 3 | Rotary supporting gear surface in the oven | hairbrush,manual adding oil | Mobil EP2 | 72 adding oil every 72 hours |
| 4 | Bearing base for transmission in the oven | oil gun, manual adding oil | Mobil EP2 | 500 adding oil every 500 hours |
| 5 | Inversed guide rail in the oven | single-point lubricator | Mobil EP2 | replace the lubricator every 6 months |
| 6 | Little chain guide rail in the oven | hairbrush,manual adding oil | Mobil EP2 | 160 adding oil every 160 hours |
| 7 | Dedusting guide rail in the oven | single-point lubricator | Mobil EP2 | replace the lubricator every 6 months |
| 8 | Rear drive plate in the oven | oil gun, manual adding oil | Mobil EP2 | 200 adding oil every 200 hours |
1.2 Centralized Lubrication System
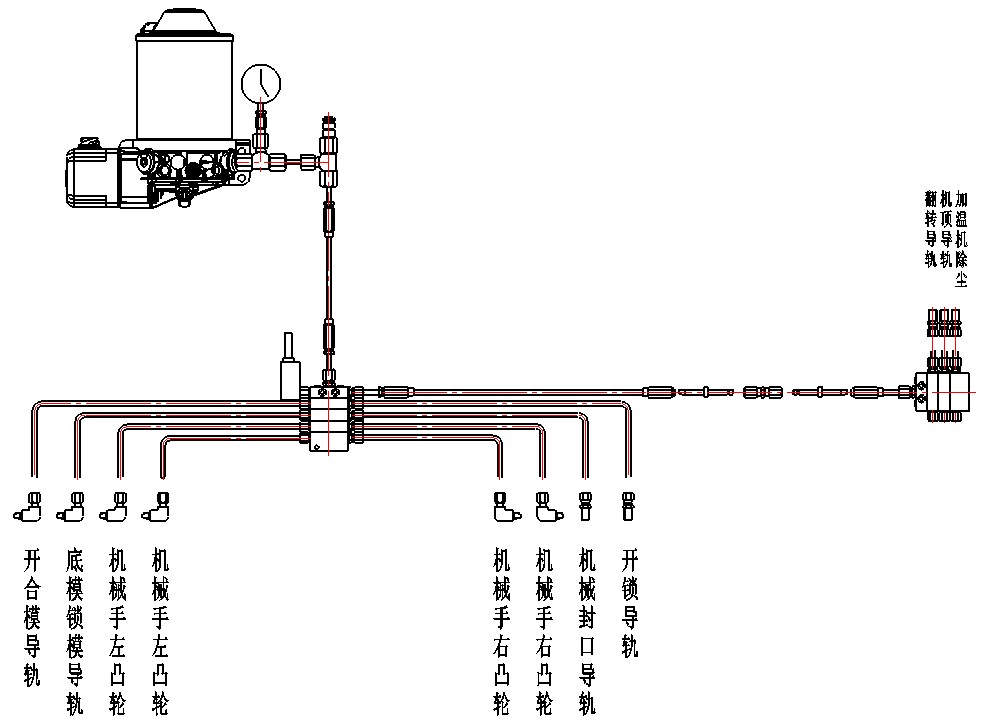
| No. | Position | Lubricant | Period | Remarks |
|---|---|---|---|---|
| 1 | Centralized lubrication system | Shell Alvania EP2 | 50 50hours |
1.3 Mould Carrier Lubrication Points
| No. | Position | Lubricant | Period | Remarks |
|---|---|---|---|---|
| A | Middle bearing | APEXFGL-2 | 1 1 week | |
| B | Arm bearing | EP2 | 1 1 week | |
| C | Connecting bearing | EP2 | 1 1 week | |
| D | pin bearing | EP2 | 1 1 week | |
| G | Mold base rail | EP2 | 1 1 week | |
| H | Area around the mold base | APEXFGL-2 | 1 1 week | |
| J | 1Mold locking pin 1 | APEXFGL-2 | 1 1 week | |
| K | 2Mold locking pin 2 | APEXFGL-2 | 1 1 week | |
| L | Bearing | APEXFGL-2 | 1 1 week | |
| M | Guiding bearing | APEXFGL-2 | 1 1 week |
1.4 Preform Infeed / Discharge Guide Lubrication
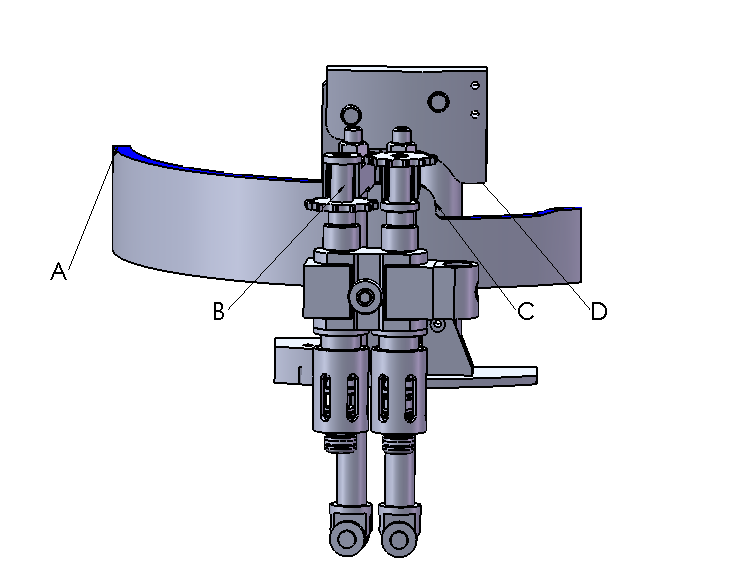
| No. | Position | Lubricant | Period | Remarks |
|---|---|---|---|---|
| A | Track | EP2 | 48 48 hours | |
| B | Heat chain | EP2 | 48 48 hours | |
| C | Track | EP2 | 48 48 hours | |
| D | Track | EP2 | 48 48 hours |
1.5 Transmission System Lubrication
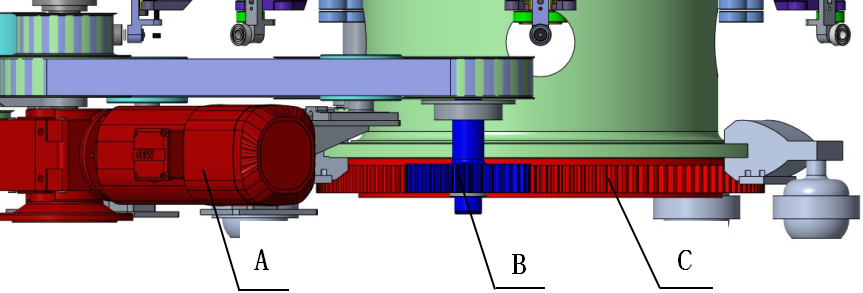
| No. | Position | ( )Lubricant | Period | Remarks |
|---|---|---|---|---|
| A | Reducer | VG220 | 1 1year reference manual | |
| B | Main drive gear | EP2 | 3 3 weeks | |
| C | Bearing | EP2 | 3 3 weeks |
1.6 Manipulator Lubrication
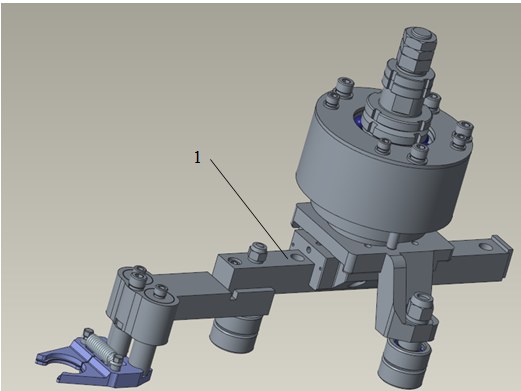
| No. | Position | ( )Lubricant | Period | Remarks |
|---|---|---|---|---|
| 1 | Linear guide rail for mechanical arm | Mobil EP2 | 140 adding oil every 140 hours | oil gun, manual adding oil |
1.7 Encoder Lubrication
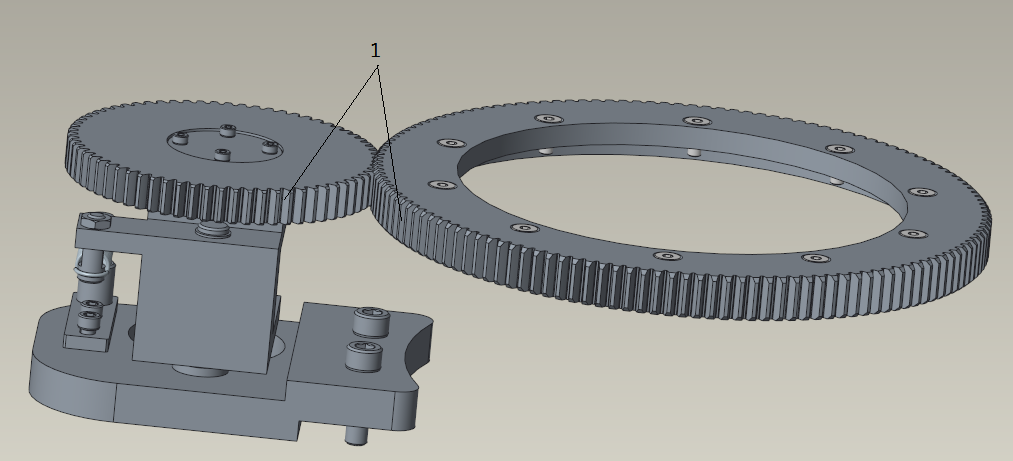
| No. | Position | ( )Lubricant | Period | Remarks |
|---|---|---|---|---|
| 1 | Gear surface on the coder | Mobil EP2 | 200 adding oil every 200 hours | hairbrush,manual adding oil |
1.8 Mechanical Seal Guide Lubrication
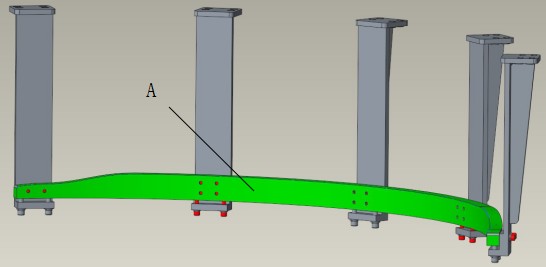
| No. | Position | Lubricant | Period | Remarks |
|---|---|---|---|---|
| A | Mechanical seal guide | EP2 | 24 |
1.9 Stretch Rail Lubrication
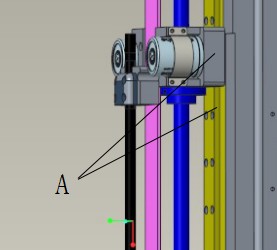
| No. | Position | ( )Lubricant | Period | Remarks |
|---|---|---|---|---|
| A | Stretch rail | EP2 | 2 weeks |
1.10 Left / Right Cam Lubrication
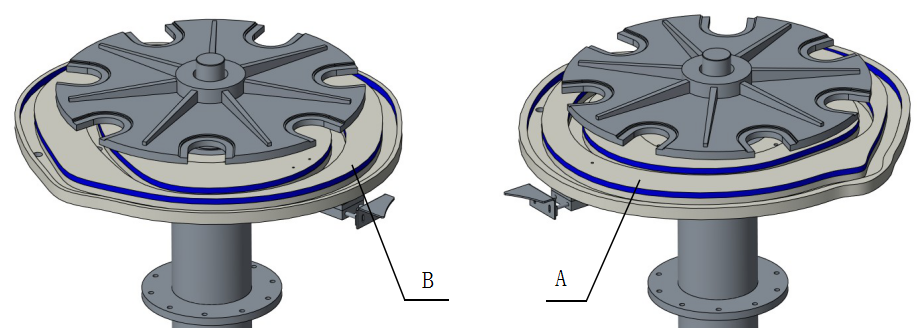
| No. | Position | ( )Lubricant | Period | Remarks |
|---|---|---|---|---|
| A | Preform infeed cam | EP2 | 1 week | |
| B | Bottle discharge cam | EP2 | 1 week |
2. Daily Inspection and Cleaning
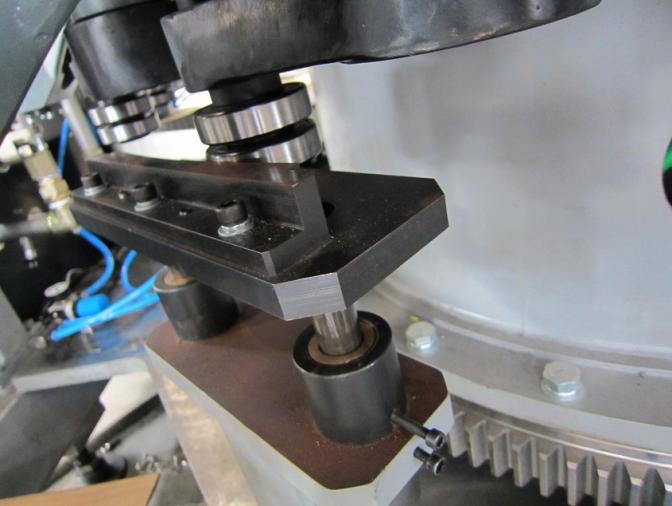
2.1 Open / Close Mould Arm Position
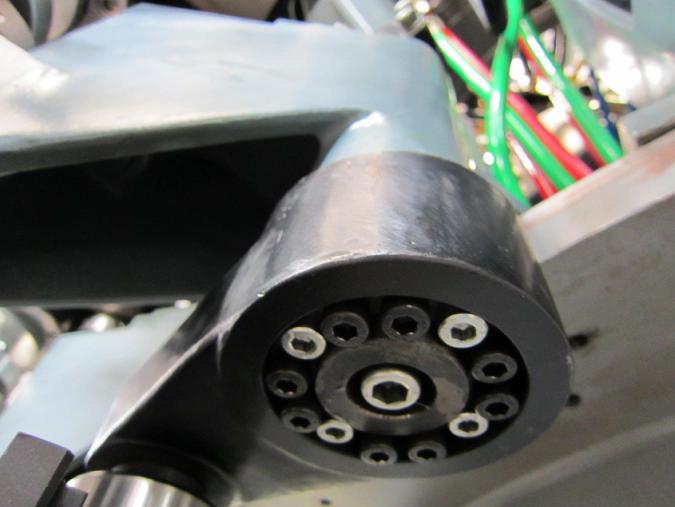
1) Raise (install) the swing-arm positioning guide. Inch the machine so the swing-arm bearing reaches the arc of the positioning guide; the bearing should pass tangent to the guide. If there is a deviation, loosen the screws of the swing-arm clamping collar, align the bearing tangent to the guide, then tighten the locking screws diagonally.
2) If the mould closing is abnormal or unsmooth during operation, leave a suitable clearance between the guide and the bearing, measure it with a feeler gauge, and keep a record.
2.2 Mould Flatness Check
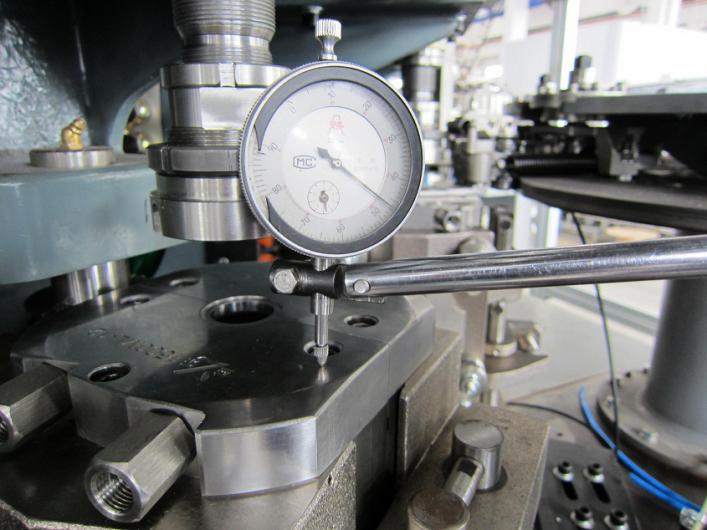
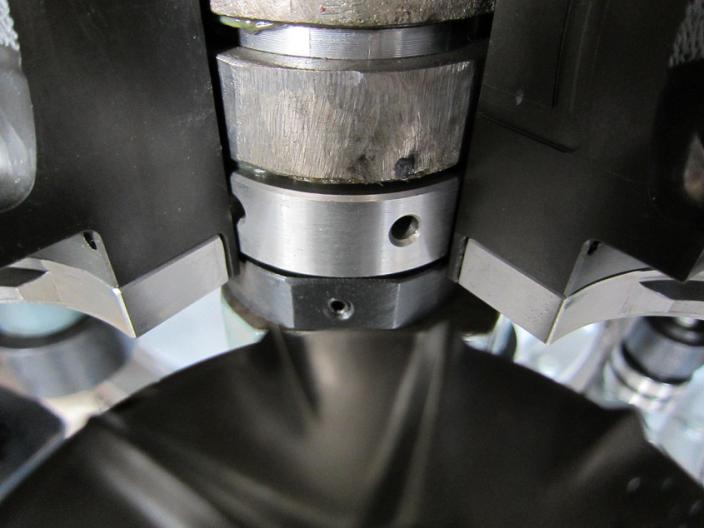
1) Inch the machine and use a dial gauge to check the flatness of the mould neck plates; the deviation must be adjusted within 0.1 mm.
2) If the dial-gauge error is severe, loosen the three set screws on the adjusting nut at the lower end of the mould-carrier main shaft, and turn the adjusting sleeve on top of the nut with a wrench: clockwise lowers the mould carrier, counter-clockwise raises it.
2.3 Bottom Mould Bearing Flatness
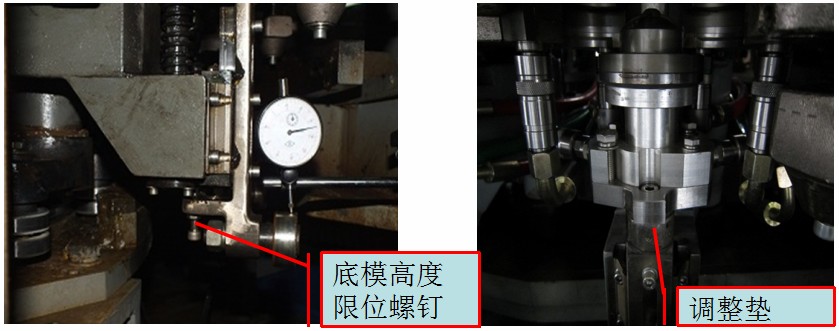
1) With the mould locked, press the bottom mould to its lowest position and adjust the clearance between the limit screw and the mould carrier to 0.1 mm, so the bottom mould sits at the correct height in the mould slot.
2) Check the flatness of the bottom-mould bearing. If there is a deviation, add or remove shims between the bottom mould and its support bracket to make the bearings level.
2.4 Bottom Mould Guide & Bearing Clearance
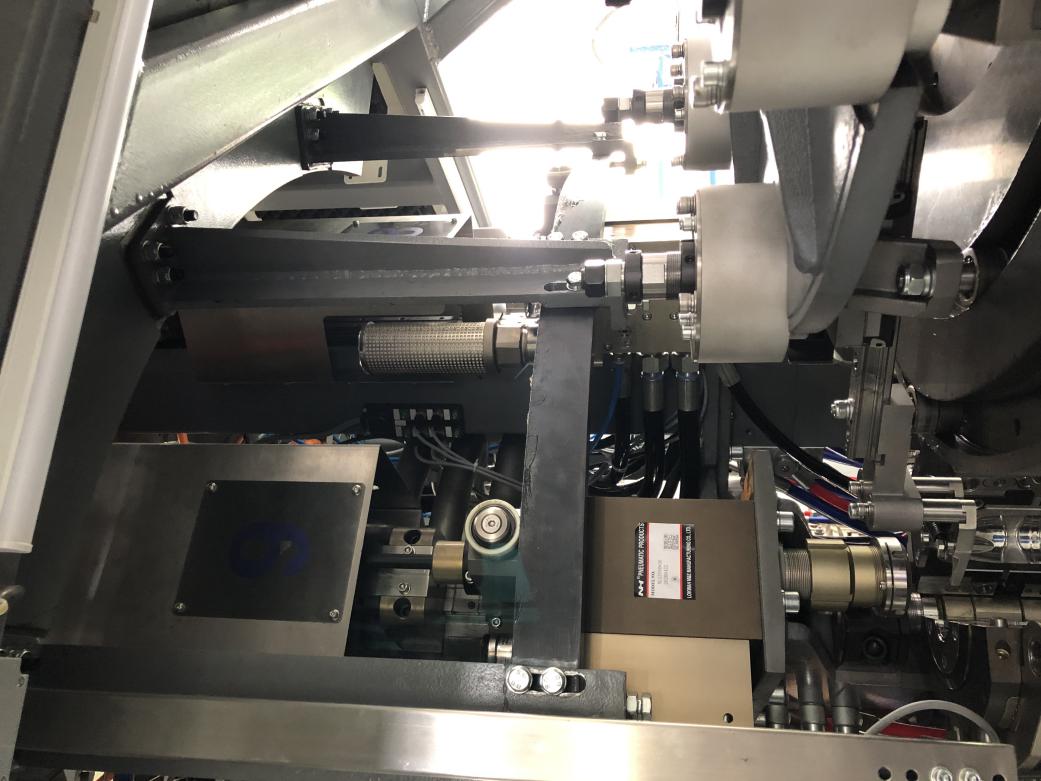
1) Inch the machine so the bottom-mould bearing travels about 20-250 mm along the bottom-mould guide, then adjust the guide so the clearance between guide and bearing is 0.05-0.1 mm.
2) At the outlet end of the guide, the bearing-to-guide clearance must be >= 0.2 mm.
3) The bottom-mould guide has two fixed seats; adjust the screws and jacking screws on the guide seat to set the guide height.
2.5 Seal Head & Mould Top-face Clearance
1) When the bearing moves to the top plane of the guide, use a caliper to check the clearance between the seal head and the mould top face; it should normally be 24-25 mm.
2) If there is a deviation, adjust it by the screws that fix the mechanical seal guide.
3. Maintenance Schedule & Content
The following is the general maintenance content and schedule; operator must confirm and carry out the plan according to the actual running condition of machine.
| Item | No. | Spare parts | Standard | Method | Tool | Every day | Every week | Every month |
|---|---|---|---|---|---|---|---|---|
| clean | 1 | Equipment surface | No dust,no oil | Clean | Cloth | √ | ||
| 2 | Inner machine | No dust,no oil,no debris | Clean | Cloth | √ | |||
| 3 | Mold | Clean in mold and surface | Clean | Soft c loth, detergent or anhydrous alcohol | √ | |||
| 4 | Heating head | No dust,no oil | Clean | Soft cloth, absolute ethyl alcohol | √ | |||
| 5 | Preform-in detecting electric eye | No dust,no oil | Clean | Soft cloth | √ | |||
| 6 | Preform infrared heating head | No dust,no oil | Clean | Soft cloth | √ | |||
| 7 | Infrared tube of heater | No dust on the surface | Clean | Soft cloth | √ | |||
| 8 | Heater reflector | No dust on the surface | Clean | Soft cloth | √ | |||
| 9 | Heater cooling fan filter | No dust on the surface | Clean | Soft cloth, absolute ethyl alcohol | √ | |||
| 10 | Heater temperature detecting head | No dust on the surface | Clean | Soft cloth | √ | |||
| 11 | Heater cooling tunnel | No dust on the surface | Clean | Soft cloth | √ | |||
| 12 | Bottle-gripping preform gripper | PET No PET debris on the surface, no oil,no dust | Clean | Soft cloth | √ | |||
| 13 | Stop system | Stop sensitive | Clean | Soft cloth, absolute ethyl alcohol | √ | |||
| 14 | Distribution cabinet | No dust | Clean | Soft cloth,compressed air | √ | |||
| 15 | 40bar 40bar high pressure air filter | No dust,no oil | Clean | Soft cloth, compressed air | √ | |||
| 16 | Cabinet conditioning | No dust | Clean | Clean or blowing by compressed air | √ | |||
| 17 | Cooling water strainer | Clean | Clean | Water cleaning | √ | |||
| lubrication(remove the old grease before and after filling)( ) | 18 | Heater top guide rail | One layer of oil film, no dripping | MobilEP2 | Brush | √ | ||
| 19 | Heating machine loading, unloading rail | One layer of oil film, no dripping | 2# Uiversal 2 # Grease | Brush | √ | |||
| 20 | Heater small chains and drive gear | One layer of oil film, no dripping | Mobil EP2 | Brush | √ | |||
| 21 | -- Mandrel - Large chain guide | One layer of oil film, no dripping | Mobil EP2 | Brush | √ | |||
| 22 | Mechanical arm linear bearings | 1 / / 1 g / month / time | Mobil EP0 | Oil gun | √ | |||
| 23 | inner and outer rail of mechanical arm cam | One layer of oil film, no dripping | Mobil EP2 | Centralized | √ | |||
| 24 | Stretching rail linear bearings | 1 / / 1 g / month / time | Mobil EP0 | Oil gun | √ | |||
| 25 | Stretching pole rail | One layer of oil film, no dripping | Mobil EP2 | Centralized | √ | |||
| 26 | Bottom mold linear bearings | 1 / / 1 g / month / time | Mobil EP0 | Oil gun | √ | |||
| 27 | Bottom mold bottom rail | One layer of oil film, no dripping | Mobil EP2 | Centralized | √ | |||
| 28 | Opening,locking mold rail | One layer of oil film, no dripping | Mobil EP2 | Centralized | √ | |||
| 29 | Opening,closing mold rail | One layer of oil film, no dripping | Mobil EP2 | Centralized | √ | |||
| 30 | Closing mold pin lock means | One layer of oil film, no dripping | Mobil EP0 | Brush | √ | |||
| 31 | / Bottom mold slot/ mold positioning pin | One layer of oil film, no dripping | Food lubricating grease | Brush | √ | |||
| 32 | / Mold spindle / swing arm shaft | Extrusion of used oil | Mobil EP2 | Oil gun | √ | |||
| 33 | Slewing support | Extrusion of used oil | Mobil EP2 | Centralized | √ | |||
| 34 | Slewing gear | One layer of oil film, no dripping | Mobil EP2 | Brush | √ | |||
| 35 | Main drive gear bearing | Extrusion of used oil | Mobil EP2 | Oil gun | √ | |||
| 36 | Encoder gear | One layer of oil film, no dripping | Mobil EP2 | Brush | √ | |||
| 37 | oil distributor | Rotating lubrication | Mobil EP2 | Oil gun | √ | |||
| spot-inspection | 38 | Air pressure control | 6-7bar | By eye | Eye | √ | ||
| 39 | Pre-blowing air pressure | 5-13bar | By eye | Eye | √ | |||
| 40 | High pressure for blowing | 28-40bar | By eye | Eye | √ | |||
| 41 | Heater big chain gap | 0.5 Gap not more than 0.5 | By feeler | Feeler | √ | |||
| 42 | Mechanical arm | Horizontal | By eye | Eye | √ | |||
| 43 | Caping module | No gas leakage,no loosing | By listening and touching by hand | Ear,hand | √ | |||
| 44 | Stretching pole locking device | No loosing | Touching by hand | Hand | √ | |||
| 45 | Stretching pole up and down limit buffer | Good buffer,no damage | Touching by hand | Hand | √ | |||
| 46 | Stretching down limit device | No loosing | By eye | Eye | √ | |||
| 47 | Bottom up limit device | No loosing 0.25-0.30mm | By feeler | Feeler | √ | |||
| 48 | The same height of molds | 0.1mm | By meter | Dial indicator | √ | |||
| spot-inspection | 49 | The same bearing height of mold opening | 0.1mm | By meter | Dial indicator | √ | ||
| 50 | Gap between stretching bearing and guide rail | 0.2mm | By meter | Dial indicator | √ | |||
| 51 | The same bearing height of bottom mold | 0.1mm | By meter | Dial indicator | √ | |||
| 52 | Alignment of mechanical arm and preform gripping table | Centering | Touching by hand | hand | √ | |||
| 53 | Alignment of mechanical arm and mold | Centering | Touching by hand | hand | √ | |||
| 54 | Gap between stretching pole and bottom mold | Down stretching pole to bottom mold 1.5-2mm Based on thickness of the preform injecti point | By feeler | Feeler | √ | |||
| 55 | Gap detection of mold closing arm | Bearing and tools 0.1-0.15mm | By feeler | Feeler | √ | |||
| 56 | Mold closing buffer | Good buffer,no damage | Touching by hand | Hand | √ | |||
| 57 | Stop system | 2-3 2-3 molds moving after stop | By eye | Eye | √ | |||
| 58 | Synchronous teethed belt | Moderate tensioning,no wear | By eye and touching by hand | Eye,hand | √ | |||
| 59 | Preform-in detecting electric eye | Clean,sensative | By eye | Eye | √ | |||
| 60 | Each proximity switches | Clean,sensative | By eye | Eye | √ | |||
| 61 | Synchrous with the whole machine | Synchrous, no misalignment | By eye | Eye | √ | |||
| 62 | Mechanical arm,stretching and bottom mold in a straight line | Flexible action | By eye | Hand,eye | √ | |||
| 63 | Stretch,bottom mold,opening and unlocking mold guide rail | No serious wear and tear, no loose | By eye | Hand,eye | √ | |||
| 64 | Heating layer | No loose | By wrench | 13 19 13 19 Open-end wrench | √ | |||
| 65 | Mold closing swing screw | No loose | By wrench | 6 6 Allen wrench | √ | |||
| 66 | Tensile slide rail mounting bolts | No loose | By wrench | 5 5 Allen wrench | √ | |||
| 67 | Stretching pole locking device | No loose | By wrench | 4 4 Allen wrench | √ | |||
| 68 | Mechanical arm gripping bolt | No loose,flexible turning | By wrench | 5 5 Allen wrench | √ | |||
| 69 | Preform-unloading protective board bolts | No loose | By wrench | 6 6 Allen wrench | √ | |||
| 1 4-6 2 Note: Maintenance every day should be one hour, 4-6 hours per week, and two days per month. Not meeting the above requirements allows no starting the machine. |
4. Inspection of Main Maintenance
4.1 Safety & Inspection Facilities
Working content: check whether it is dirty, damaged, working normally or not; clean, repair or change if necessary;
Inspecting standard: ensure the installation of all safety and inspection facility is right and working normally; there is no scratch or crackle on the reflecting glass of photoelectric cell.
4.2 Filter
Working content: check whether there is a leakage or not, the volume of chilling water; fasten, change parts and discharging chilling water if necessary;
Inspecting standard: cleanness of filter, liquid level of chilling water could be over the standard.
Remark: the job could be done before reducing the pressure of the system; each filter should be done like this (please do not forget to treat cabinet, compressed air).
4.3 Mould
Working content: clean mold and check air exit hole;
Inspecting standard: the mold is clean and air exit is smooth.
4.4 Infrared Lamp
Working content: check the lamps by eyeballing, change the broken lamp or those could not be used any more, adjust the distance if necessary;
Inspecting standard: the lamp is not broken, light of lamp is normal and the position of lamp meets the demand.
Remark: when check, the light of lamp could not be too high to avoid hurting the eye; adjust and change lamp after reducing the temperature and shutting down the power.
4.5 Water / Air / Oil Circuits
Working content: check whether there is a leakage and the bolt connection of pipe is stable or not;
Inspecting standard: there is no leakage.
4.6 Driving Components
Working content: check the tension of synchronous belt is suitable, worn out or not, check the surface of gear is worn out or not, relative position of wheel meets the demands or not, tension or change parts if necessary;
Inspecting standard: belt is not aging, mangling, broken, wearing in allowing range (synchronous belt must has correct direction), suitable tension; the wearing on the surface of gear is in the allowing range; the difference of height of driving wheel is less than 0.5% of axis distance, the angle misposition of driving wheel is less than 0.25° each meter of axis distance, the surface of gear is less than 1mm.
4.7 Slewing Bearing
Working content: check sealing ring is right, connecting bolt is stable and the lubrication is good or not, the wearing condition of gear;
Inspecting standard: sealing ring is right, connecting bolt is stable, lubrication is good and wear of gear is even and in the allowing range.
4.8 Reducer
Working content: check there is a leakage and the quality of lubrication grease is good or not, whether lubrication oil meets the demand. Reseal and add oil if necessary;
Inspecting standard: there is no leakage, oil level is normal and the quality of oil is good.
Remark: when there is more foreign material in the oil, please contact with professional company or engineers of china-beverage company.
4.9 Cooling Water
Working content: the quality of water;
Inspecting standard: refer to relative standard.
Remark: use clean container to take the sample and seal the sample.
3.10 Pneumatic Components
Working content: check each pneumatic element is working or not;
Inspecting standard: refer to relative standard.
5. Equipment Storage & Reuse
Please follow up the belw process if the equipment need long time stop.
Completely discharge the water, oil and air in the equipment;
Make anti-rust treatment for the parts may be rust;
Put it in a dry place for storage;
Lock main rotary bearing.
Please follow up the below process when reuse the equipment:
Clean the equipment;
Lubricate each requested lubrication points;
Adjust each parts of the equipment;
Dischagre the air in the oil and water pipes.


